


About the project
In this project, we will automate the process of updating security group rules with the latest IP addresses used by GitHub services. We will set up a lambda function that will update the security group rules and then automate this process by using the AWS EVENT BRIDGE service. We will set up an AWS EVENT BRIDGE Schedule which will target and trigger our lambda function in our specified time intervals so that security group rules get updated with the latest IP addresses of GitHub services. It’s important to know that GitHub keeps changing the IP addresses of its services.
What are the applications for this project, why do we need to update these rules?
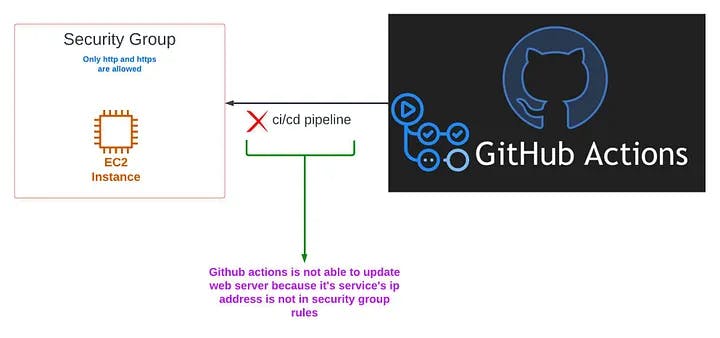
So here’s the background story behind this project. I am a beginner at DevOps and I was working for a startup where I was designing cloud architecture for their website and services. In this architecture, we wanted to only allow HTTP and HTTPS connections on the ec2 instances to all IP addresses (0.0.0.0/0). But we ran into a problem here, The problem was-
Problem statement-
We had a GitHub action ci/cd pipeline, whenever there was a change in GitHub repository it would get pushed to the ec2 instances through GitHub actions but since we are only allowing all ip addresses to ec2 instances on http and https connections on security group of those instances, the change would not take place, the website will not get updated with the latest code as GitHub actions changes would get rejected by the security group of the instances because security group does not have ip addresses of GitHub action’s services.
So what’s the problem here? Just get the GitHub action IP addresses and add them to the security group rules right? This is the point where the problem arises, GitHub keeps changing the IP addresses of its services at irregular intervals of time, and it’s tedious to keep track of changed IP addresses and then manually update security group rules with the latest IP addresses. Here comes the need for this project, in this project, we will automate this process, and we will update security group rules at intervals that we set. I want to add here that there may be other ways maybe better ways with which DevOps engineers and Cloud Architects do this but as I am just starting my DevOps journey, I used this approach to solve the problem. Anyways you are going to learn a lot from this project such as AWS SDK boto3 client, and Lambda function concepts such as layers and triggers so you should still do this project.
Let’s start building the project
We need to setup the lambda function but our function is going to need some permissions to do its job, so we are starting by creating IAM ROLE with the necessary permissions.
Create IAM Role -
To create a policy, go to IAM (Identity and Access Management), on the left side of the screen select policies and then click on create policy button on the top right of your screen.

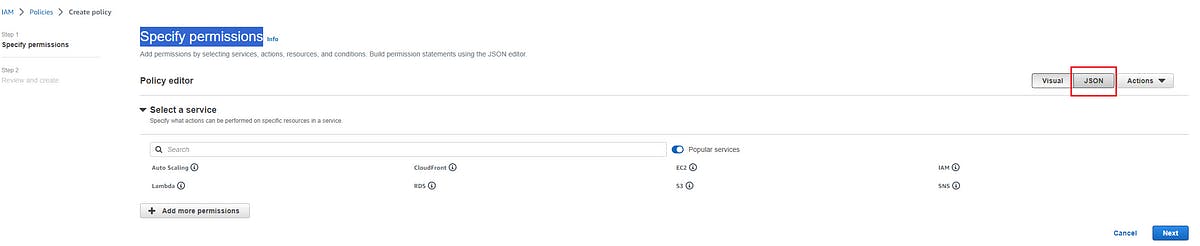
Then at Specify permissions page, click on JSON on the right side of screen
You should be seeing policy editor now, like this-
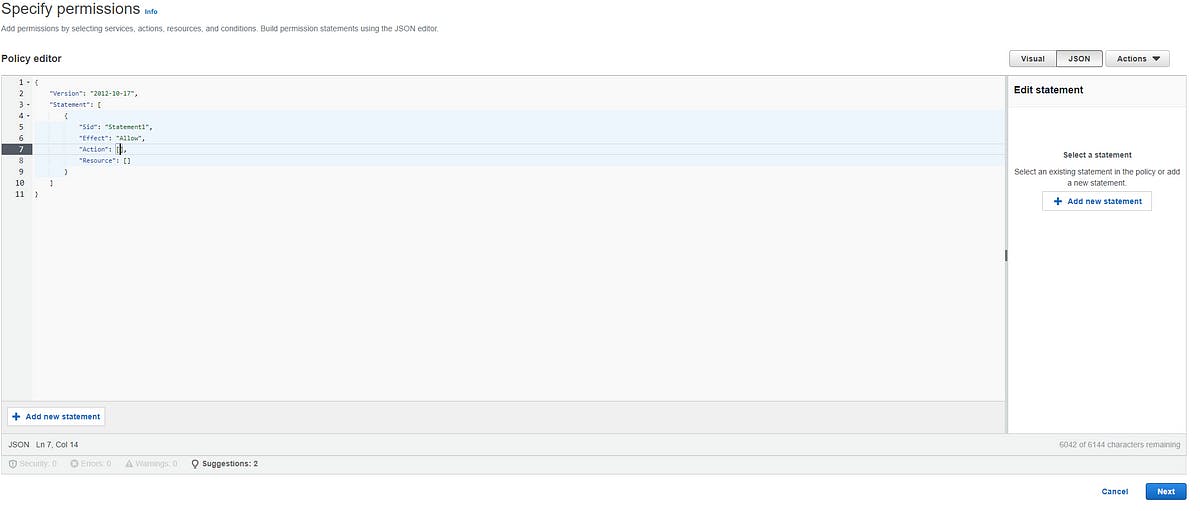
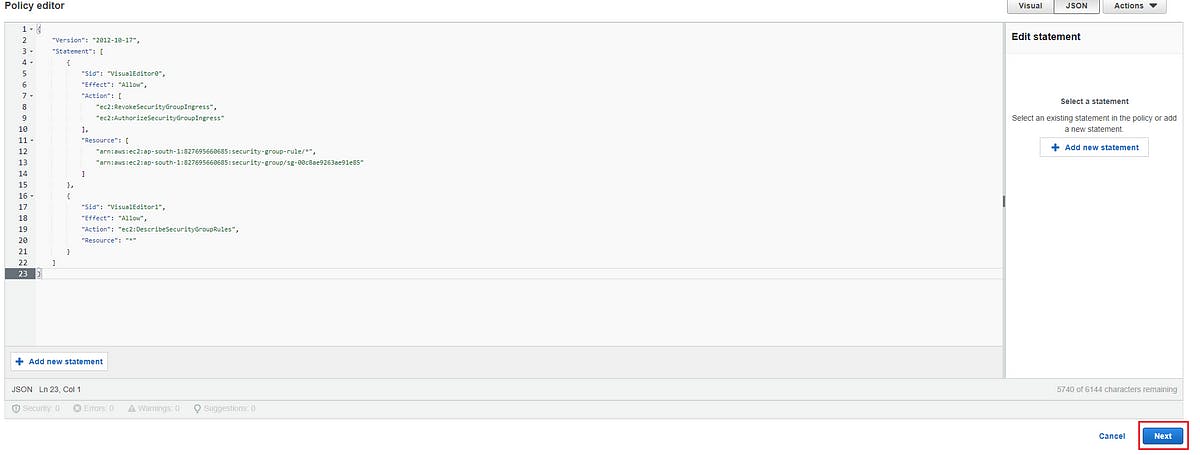
select all code in the Policy editor and remove it. Now paste the code below into the Policy Editor
{
"Version": "2012-10-17",
"Statement": [
{
"Sid": "VisualEditor0",
"Effect": "Allow",
"Action": [
"*",
"*"
],
"Resource": [
"arn:aws:ec2:ap-south-1:827695660685:security-group-rule/*",
"arn:aws:ec2:ap-south-1:827695660685:security-group/sg-00c8ae9263ae91e85"
]
},
{
"Sid": "VisualEditor1",
"Effect": "Allow",
"Action": "ec2:DescribeSecurityGroupRules",
"Resource": "*"
}
]
}
Now click on next on the bottom right of your screen
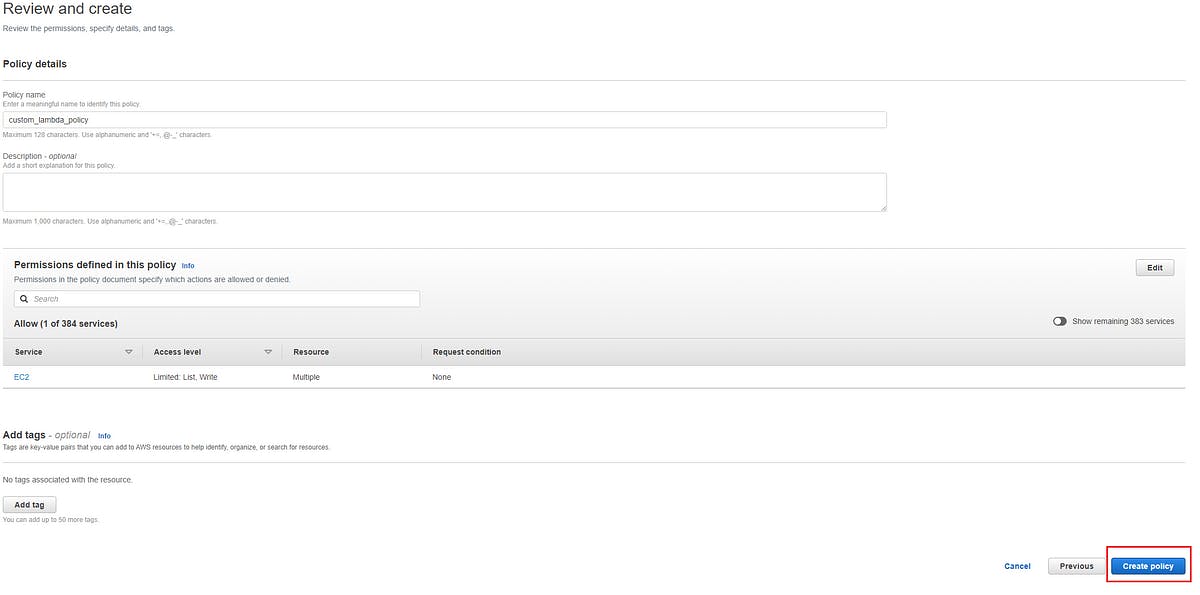
You should be at the Review and create page now, name your policy as custom_lambda_policy and then click create policy button on the bottom right side of your screen
Now create a role, which will use the policy we created above. Again go to IAM (Identity and Access Management), on the left side of the screen select roles and then click on create role button on the top right of your screen

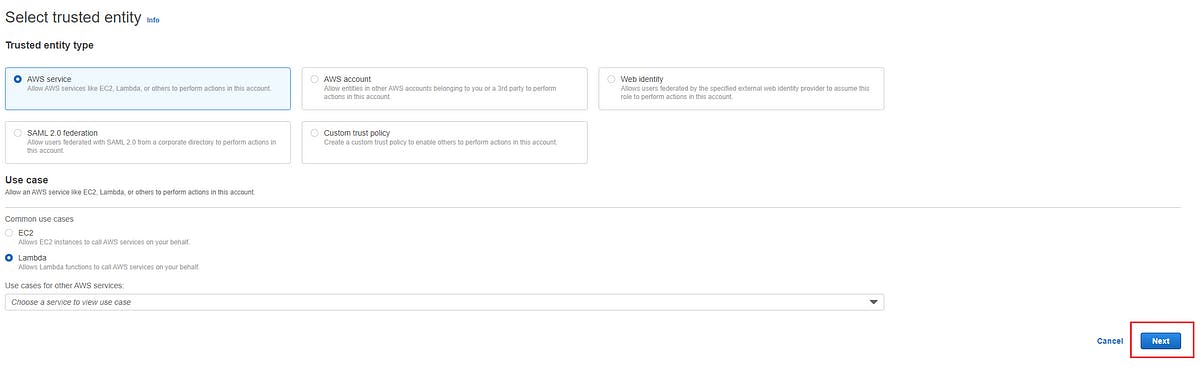
You will be at the Select trusted entity page, select AWS service in Trusted entity type after doing this click on Lambda in the Use case section. Your page should look like this-
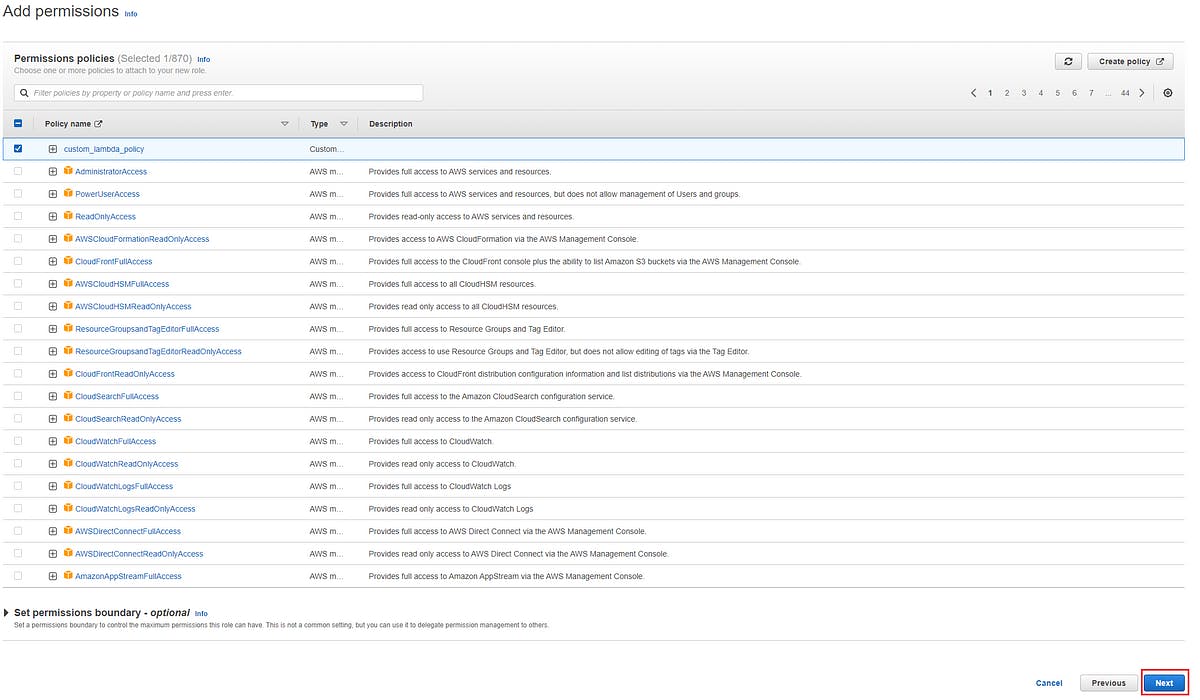
Click next. You will now be at Add permissions page, select the policy we made above, it will be name as custom_lambda_policy and then click on next
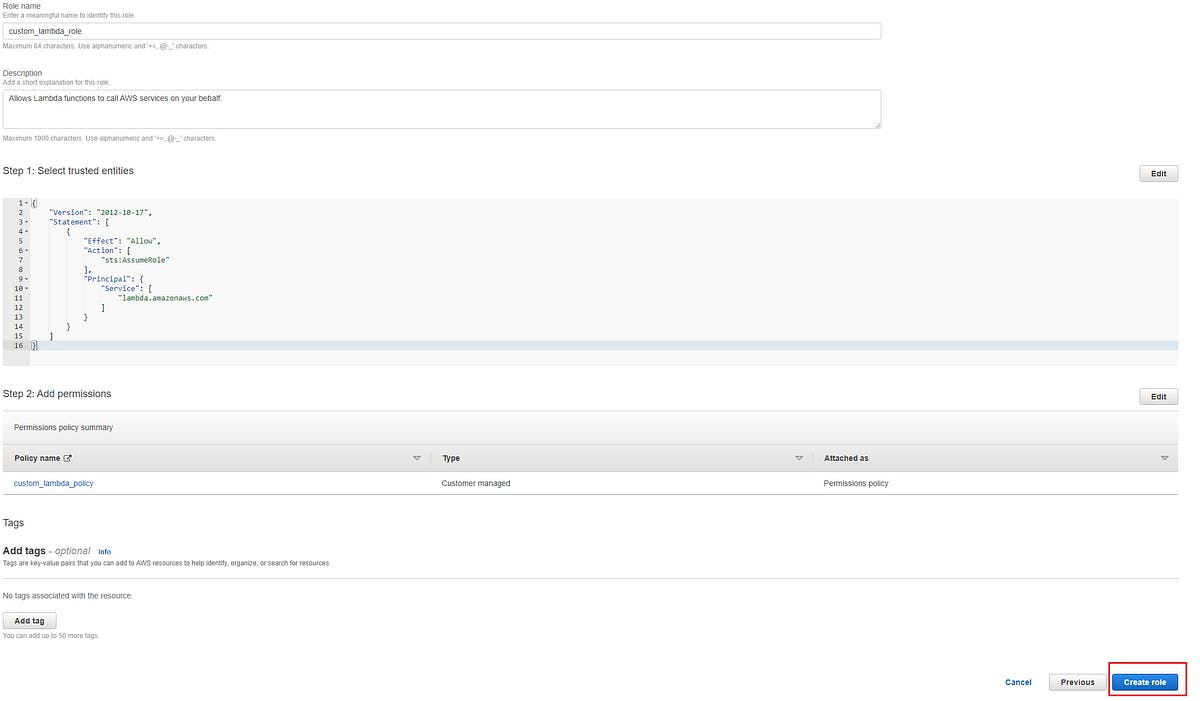
Now you will at Name, review, and create page , name your role as custom_lambda_role and then click on create role on the lower right side of your screen.
Now go to the role we just created in roles section of IAM, click on attach policy in add permissions button-
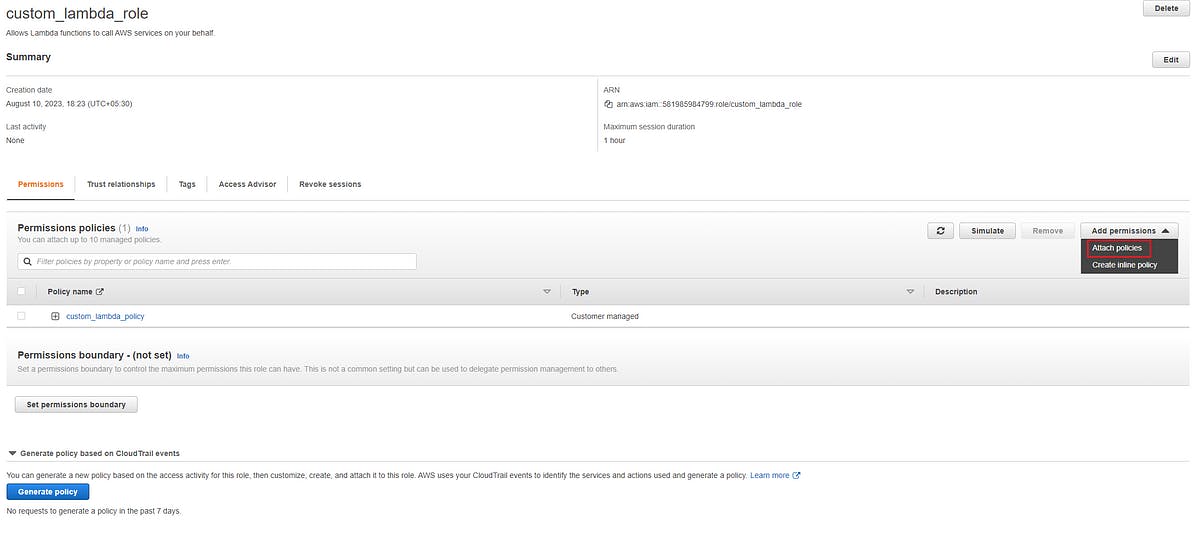
Now on the next page search cloudwatch and then select CloudWatchLogsFullAccess permission policy and then click on Add permissions.
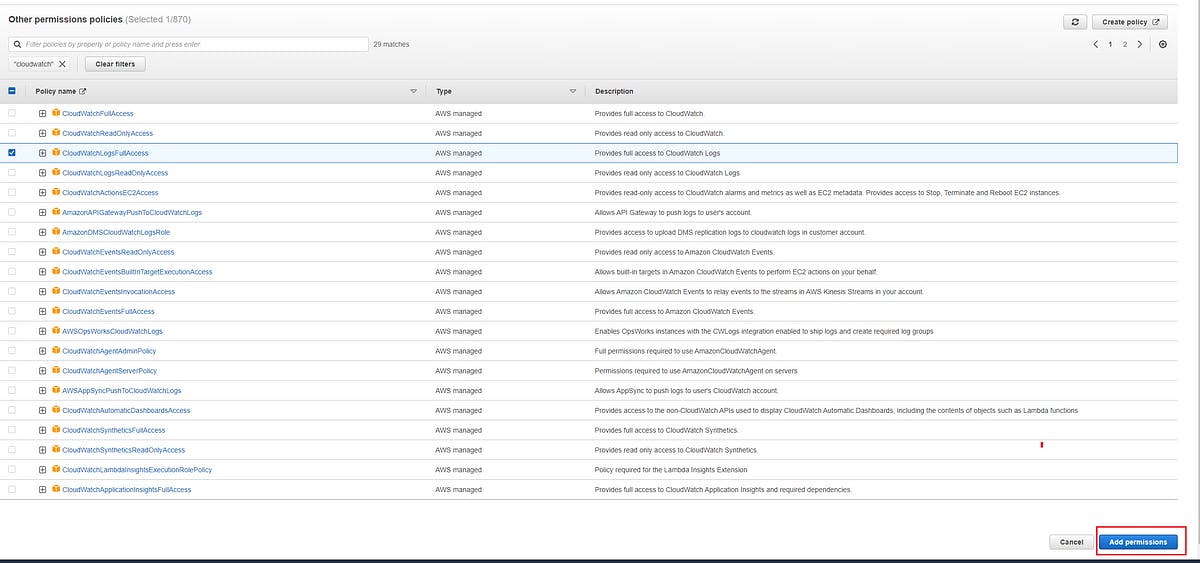
Now there will be custom_lambda_policy and CloudWatchLogsFullAccess permission policies in our role

Let’s create Lambda Function-
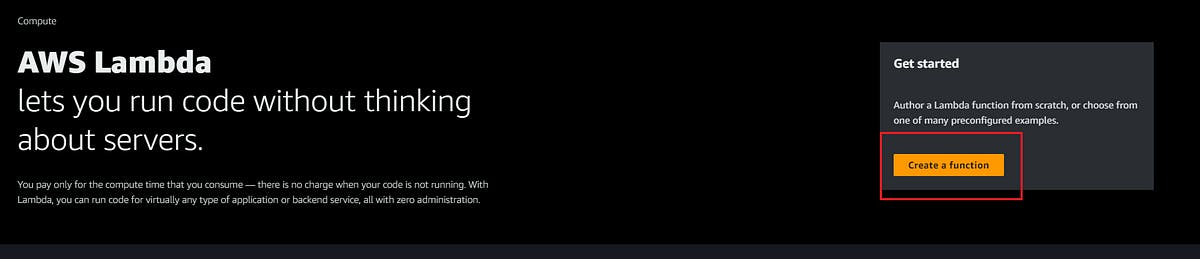
Go to Lambda service and click on create function
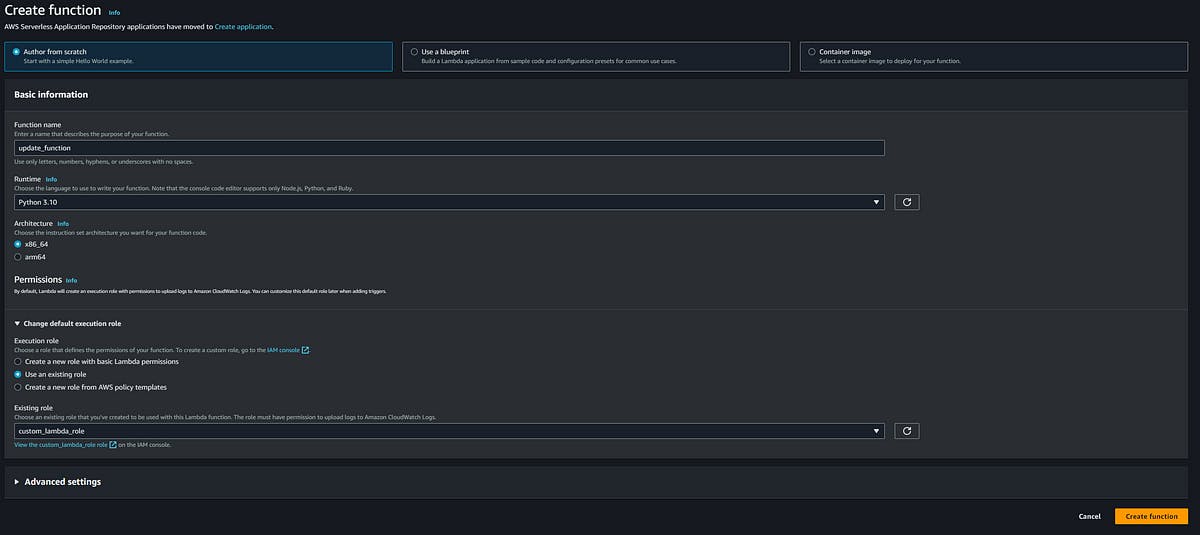
You will be at Create function page, select Author from scratch and then name your function as update_function and then select python 3.10 in Runtime and then select x86_64 in Architecture.
click on change default execution role in permission section. Select Use an existing role and then select custom_lambda_role which we created earlier
Click on create function and your page should look like this-
Once you have created the lambda function you need to configure some settings in lambda function.
We are setting the timeout now.
Timeout
Timeout is a parameter which decides the maximum time your function can run for. If your function is taking more time to run than the set time in timeout, you will receive timeout error. You can set timeout up to 15 minutes in AWS lambda but by default the set timeout will be less than 15 minutes. I have it set at 3 seconds by default.
Change the Timeout
Go to the lambda function which we have created, go to the configuration section, under configuration section click on General configuration. Click on edit.
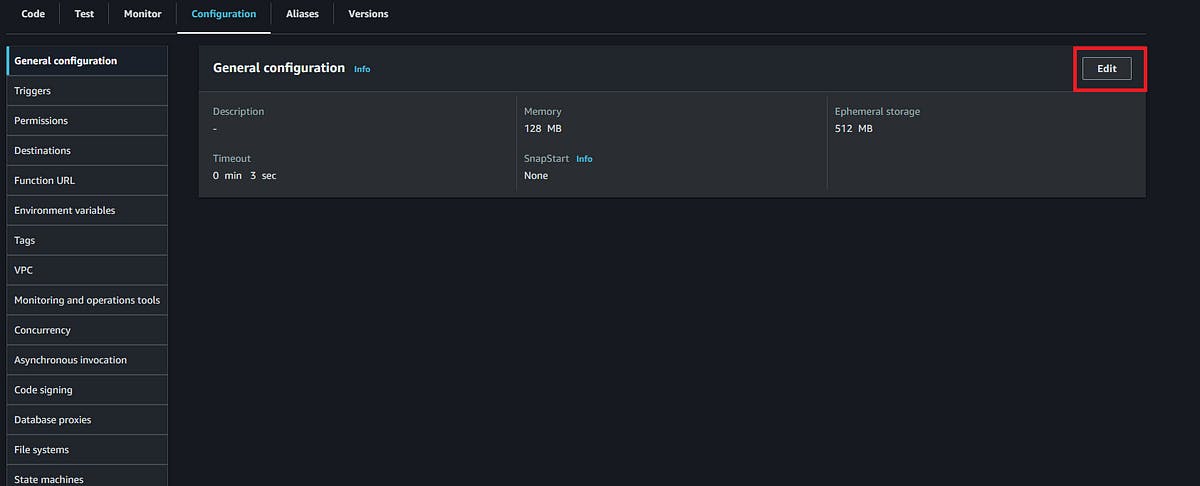
After clicking on edit, you will be at Edit basic settings now you set the timeout to 4 minutes (Function will not run for this long but still setting it to 4 minutes so that I do not receive an error since I don’t know exactly how long it will take lambda function to run). Your page should look something like this-

Click on save.
After this, we will now set layers.
Layers
In AWS Lambda, a layer refers to a distribution mechanism for libraries, custom runtimes, or other function dependencies that can be used by multiple Lambda functions. In short layer will contain the module which we will be importing using import statement in our code.
Add layer
Go to the lambda function which we have created, and go to the code section, at the bottom of the code section you will see the Add a layer button. Click on this Add a layer button.

Now you will be at Add layer page, in Choose a layer section select AWS layers, below this choose AWS layer named as AWSSDKPandas-Python310 then select 3 in the version. Your page should look like this-

Click on Add button.
Now let’s look at the code which the lambda function is gonna use.
About the code
Before talking about the code, let me tell you about the URL which will open the page which will contain all the IP addresses used by all services of GitHub. Here is the link-
If you check out the link above you will see GitHub’s services and the IP addresses which are being used by these services. For example, some of the services are- web, API, hooks, etc.
Since we are programming in Python we are going to use AWS boto3 client which is an AWS SDK for Python. In the code, various boto3 methods and functions are being used so it is advised to see boto3 documentation. Here is the documentation link you should checkout.
EC2 - Boto3 1.28.23 documentation
*A low-level client representing Amazon Elastic Compute Cloud (EC2) Amazon Elastic Compute Cloud (Amazon EC2) provides…*boto3.amazonaws.com
authorize_security_group_ingress - Boto3 1.28.24 documentation
*Client / authorize_security_group_ingress Adds the specified inbound (ingress) rules to a security group. An inbound…*boto3.amazonaws.com
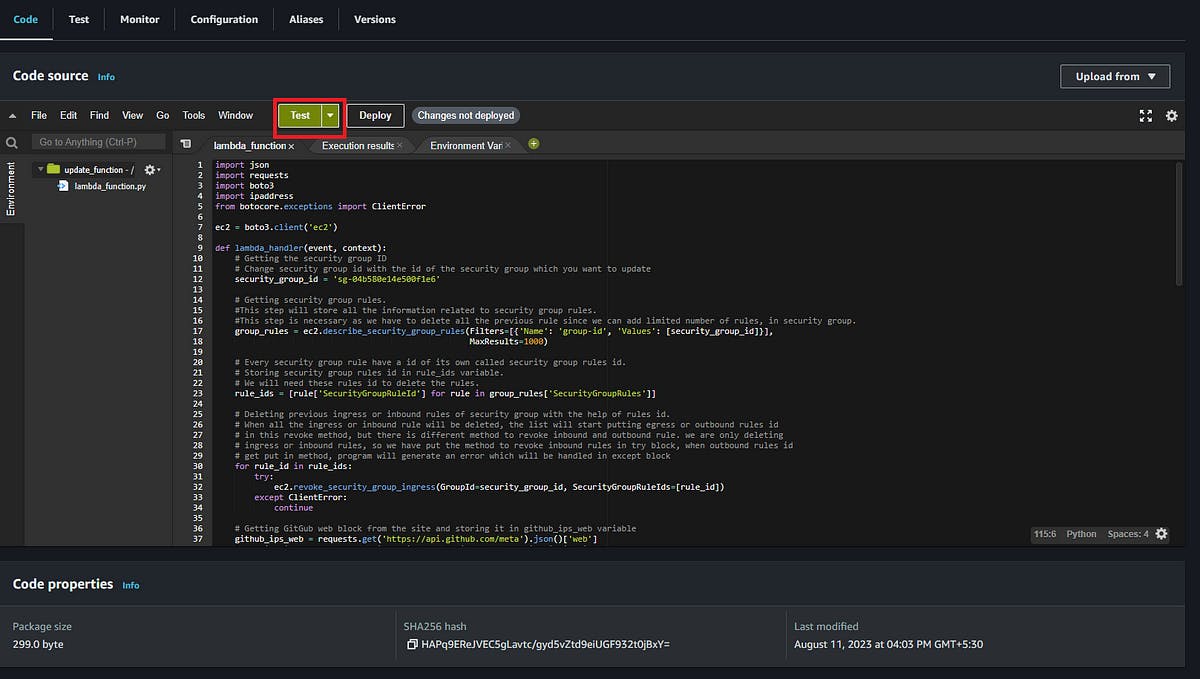
Below is the code for the lambda function, code is explained in detail in commented-out lines. Make sure you enter the security group id of your security group in the code provided below.
import json
import requests
import boto3
import ipaddress
from botocore.exceptions import ClientError

ec2 = boto3.client('ec2')

def lambda_handler(event, context):
# Getting the security group ID
# Change security group id with the id of the security group which you want to update
security_group_id = 'sg-04b580e14e500f1e6'

# Getting security group rules.
#This step will store all the information related to security group rules.
#This step is necessary as we have to delete all the previous rule since we can add limited number of rules, in security group.
group_rules = ec2.describe_security_group_rules(Filters=[{'Name': 'group-id', 'Values': [security_group_id]}],
MaxResults=1000)

# Every security group rule have a id of its own called security group rules id.
# Storing security group rules id in rule_ids variable.
# We will need these rules id to delete the rules.
rule_ids = [rule['SecurityGroupRuleId'] for rule in group_rules['SecurityGroupRules']]

# Deleting previous ingress or inbound rules of security group with the help of rules id.
# When all the ingress or inbound rule will be deleted, the list will start putting egress or outbound rules id
# in this revoke method, but there is different method to revoke inbound and outbound rule. we are only deleting
# ingress or inbound rules, so we have put the method to revoke inbound rules in try block, when outbound rules id
# get put in method, program will generate an error which will be handled in except block
for rule_id in rule_ids:
try:
ec2.revoke_security_group_ingress(GroupId=security_group_id, SecurityGroupRuleIds=[rule_id])
except ClientError:
continue

# Getting GitGub web block from the site and storing it in github_ips_web variable
github_ips_web = requests.get('https://api.github.com/meta').json()['web']
# Getting ip addresses from github_ips_web variable and storing it in cidr_blocks_web
cidr_blocks_web = [f"{ip}" for ip in github_ips_web]

# Getting GitGub api block from the site and storing it in github_ips_api variable
github_ips_api = requests.get('https://api.github.com/meta').json()['api']
# Getting ip addresses from github_ips_api variable and storing it in cidr_blocks_api
cidr_blocks_api = [f"{ip}" for ip in github_ips_api]

# Authorize inbound traffic for each IP address in web block.
# Try block is for ipv4 cidr addresses and except block is for ipv6 cidr addresses.
# I have to put in try and except block because GitHub uses both ipv4 and ipv6 cidr addresses but in boto3 client
# we have different method for adding the ipv4 and ipv6 cidr addresses so if we try to add ipv6 cidr address in the
# method used for adding ipv4 cidr address we would get error and program will fail. So i am using a python module
# named "ipaddress" which will take ip cidr address and give an error if its ipv6 cidr address, this error will get
# handled in except block which has function to add ipv6 cidr address.
# I am setting connection to ssh port 22, you can set connection as per your need.
for cidr_block_web in cidr_blocks_web:

try:
ipaddress.IPv4Network(cidr_block_web)
ip_permission = {
'IpProtocol': 'tcp',
'FromPort': 22,
'ToPort': 22,
'IpRanges': [{'CidrIp': cidr_block_web, 'Description': 'This ip is of github web block'}]
}
except ValueError:
ip_permission = {
'IpProtocol': 'tcp',
'FromPort': 22,
'ToPort': 22,
'Ipv6Ranges': [{'CidrIpv6': cidr_block_web, 'Description': 'This ip is of github web block'}]
}
ec2.authorize_security_group_ingress(GroupId=security_group_id, IpPermissions=[ip_permission])

# Authorize inbound traffic for each IP address cidr in api block.
# Try block is for ipv4 cidr addresses and except block is for ipv6 cidr addresses.
# I have to put in try and except block because GitHub uses both ipv4 and ipv6 cidr addresses but in boto3 client
# we have different method for adding the ipv4 and ipv6 cidr addresses so if we try to add ipv6 cidr address in the
# method used for adding ipv4 cidr address we would get error and program will fail. So i am using a python module
# named "ipaddress" which will take ip cidr address and give an error if its ipv6 cidr address, this error will get
# handled in except block which has function to add ipv6 cidr address.
# I am setting connection to ssh port 22, you can set connection as per your need.
for cidr_block_api in cidr_blocks_api:

try:
ipaddress.IPv4Network(cidr_block_api)
ip_permission = {
'IpProtocol': 'tcp',
'FromPort': 22,
'ToPort': 22,
'IpRanges': [{'CidrIp': cidr_block_api, 'Description': 'This ip is of github api block'}]
}
except ValueError:
ip_permission = {
'IpProtocol': 'tcp',
'FromPort': 22,
'ToPort': 22,
'Ipv6Ranges': [{'CidrIpv6': cidr_block_api, 'Description': 'This ip is of github api block'}]
}

# Now GitHub may be using same ip address cidr in two or more service blocks, in our case there may be a case
# where GitHub may be using same ip cidr address in web and api block. In this case a situation will arise
# where an address is getting added again in security group rule which will generate error. So below in try and
# except block we are handling this situation, if error arises it will be handled in except block.
try:
ec2.authorize_security_group_ingress(GroupId=security_group_id, IpPermissions=[ip_permission])
except ClientError:
continue

# When the program gets run successfully it will return this function.
# "The security group ingress rules has been successfully updated with latest ip addresses of github services" will
# be displayed.
return {
'statusCode': 200,
'body': json.dumps(
'The security group ingress rules has been successfully updated with latest ip addresses of github services')
}
In your lambda function, select the code tab and remove the code present there by default(Hello from lambda). Paste the code provided above. and click on Deploy.
Deploy- Deploy is something like ctrl+s we do in notepad or some other code editor. The difference is it’s saving our new code in lambda function.

After deploying the code, set the Test, by Test you can make your lambda function run and do its job. You can test if your code is working fine or producing some error.
To set Test click on Test button
You will be at Configure test event page after clicking on Test, name event as My_Test_Event click on save without changing anything.
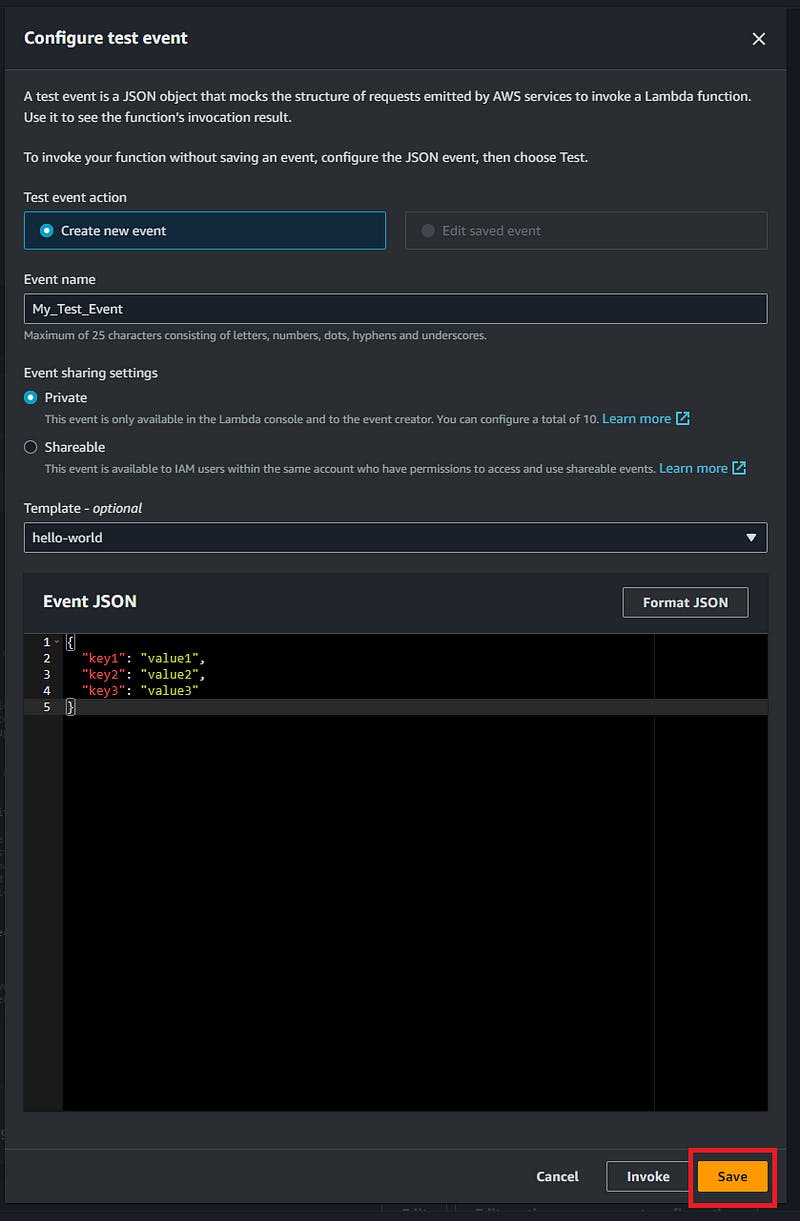
Test is set now. Every time you click on Test button from now on, your lambda function is going to run. Click on Test to run the lambda function. If you see “statusCode”: 200 and “The security group ingress rules has been successfully updated with latest IP addresses of GitHub services” on your screen, means your function ran successfully and did its job.

Now you can go and check your security group inbound rules, it will have the cidr ip addresses of GitHub services. If everything is working fine now, Congratulations buddy you did most of the work. We just now have to set up a trigger in Amazon EventBridge.
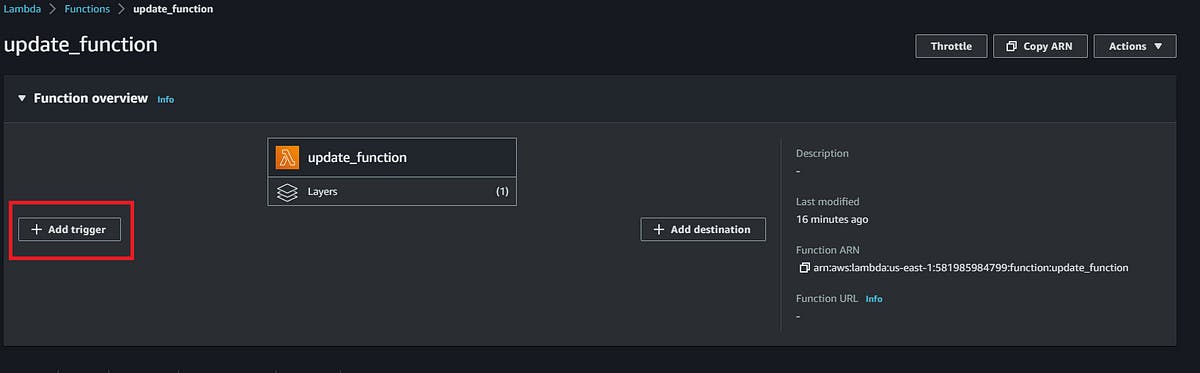
Set the Trigger
Go to your lambda function, and click on Add trigger in Function overview.
You will be at Add trigger page and select EventBridge (CloudWatch Events) as a source. In the rule section click on Create a new rule. Select the rule name as function_trigger and enter a Rule description of your choice (optional). Select Schedule expression as Rule type. Now enter this cron expression in the Schedule expression-
cron(0 15 1 */3 ? *)
This cron expression will run lambda function at 1:15 AM on every 3rd day of the month. After entering cron expression click on Add.

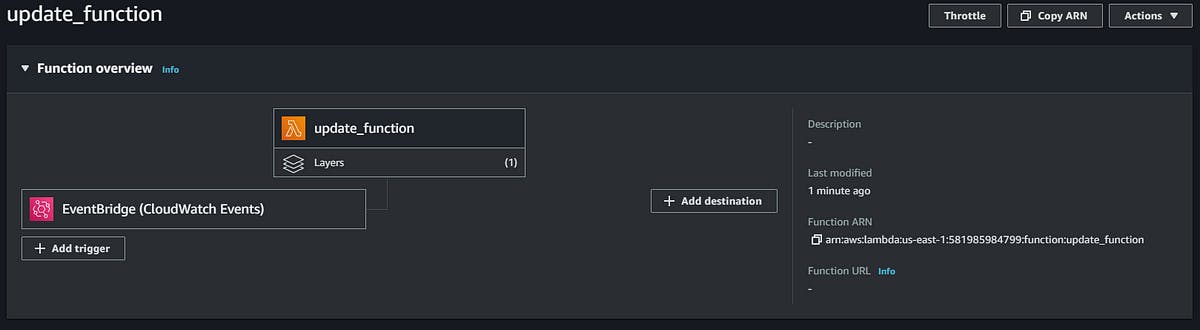
Now you have scheduled the trigger event. The function overview will look like this-
At this point, the project is completed. Your lambda function will update your security group inbound rule with the latest IP addresses of GitHub every 3 months.
I hope you learned something from this project. If there is a mistake or I have missed something or you are facing problem with this project or have any questions or just want to share your thoughts on the project feel free to comment.
Thank you for reading, see you around.
— Anshul Singh