Deploying Microservice App on K8s
Part 2: Cloud Architecture and Terraform

I document my learnings here.
In this blog, I will discuss the cloud architecture for the microservices application and the terraform files to build the same architecture.
For this blog, you must read the previous blog of this project series so that you understand this one well. Below is the previous blog link on this project.
Cloud Architecture
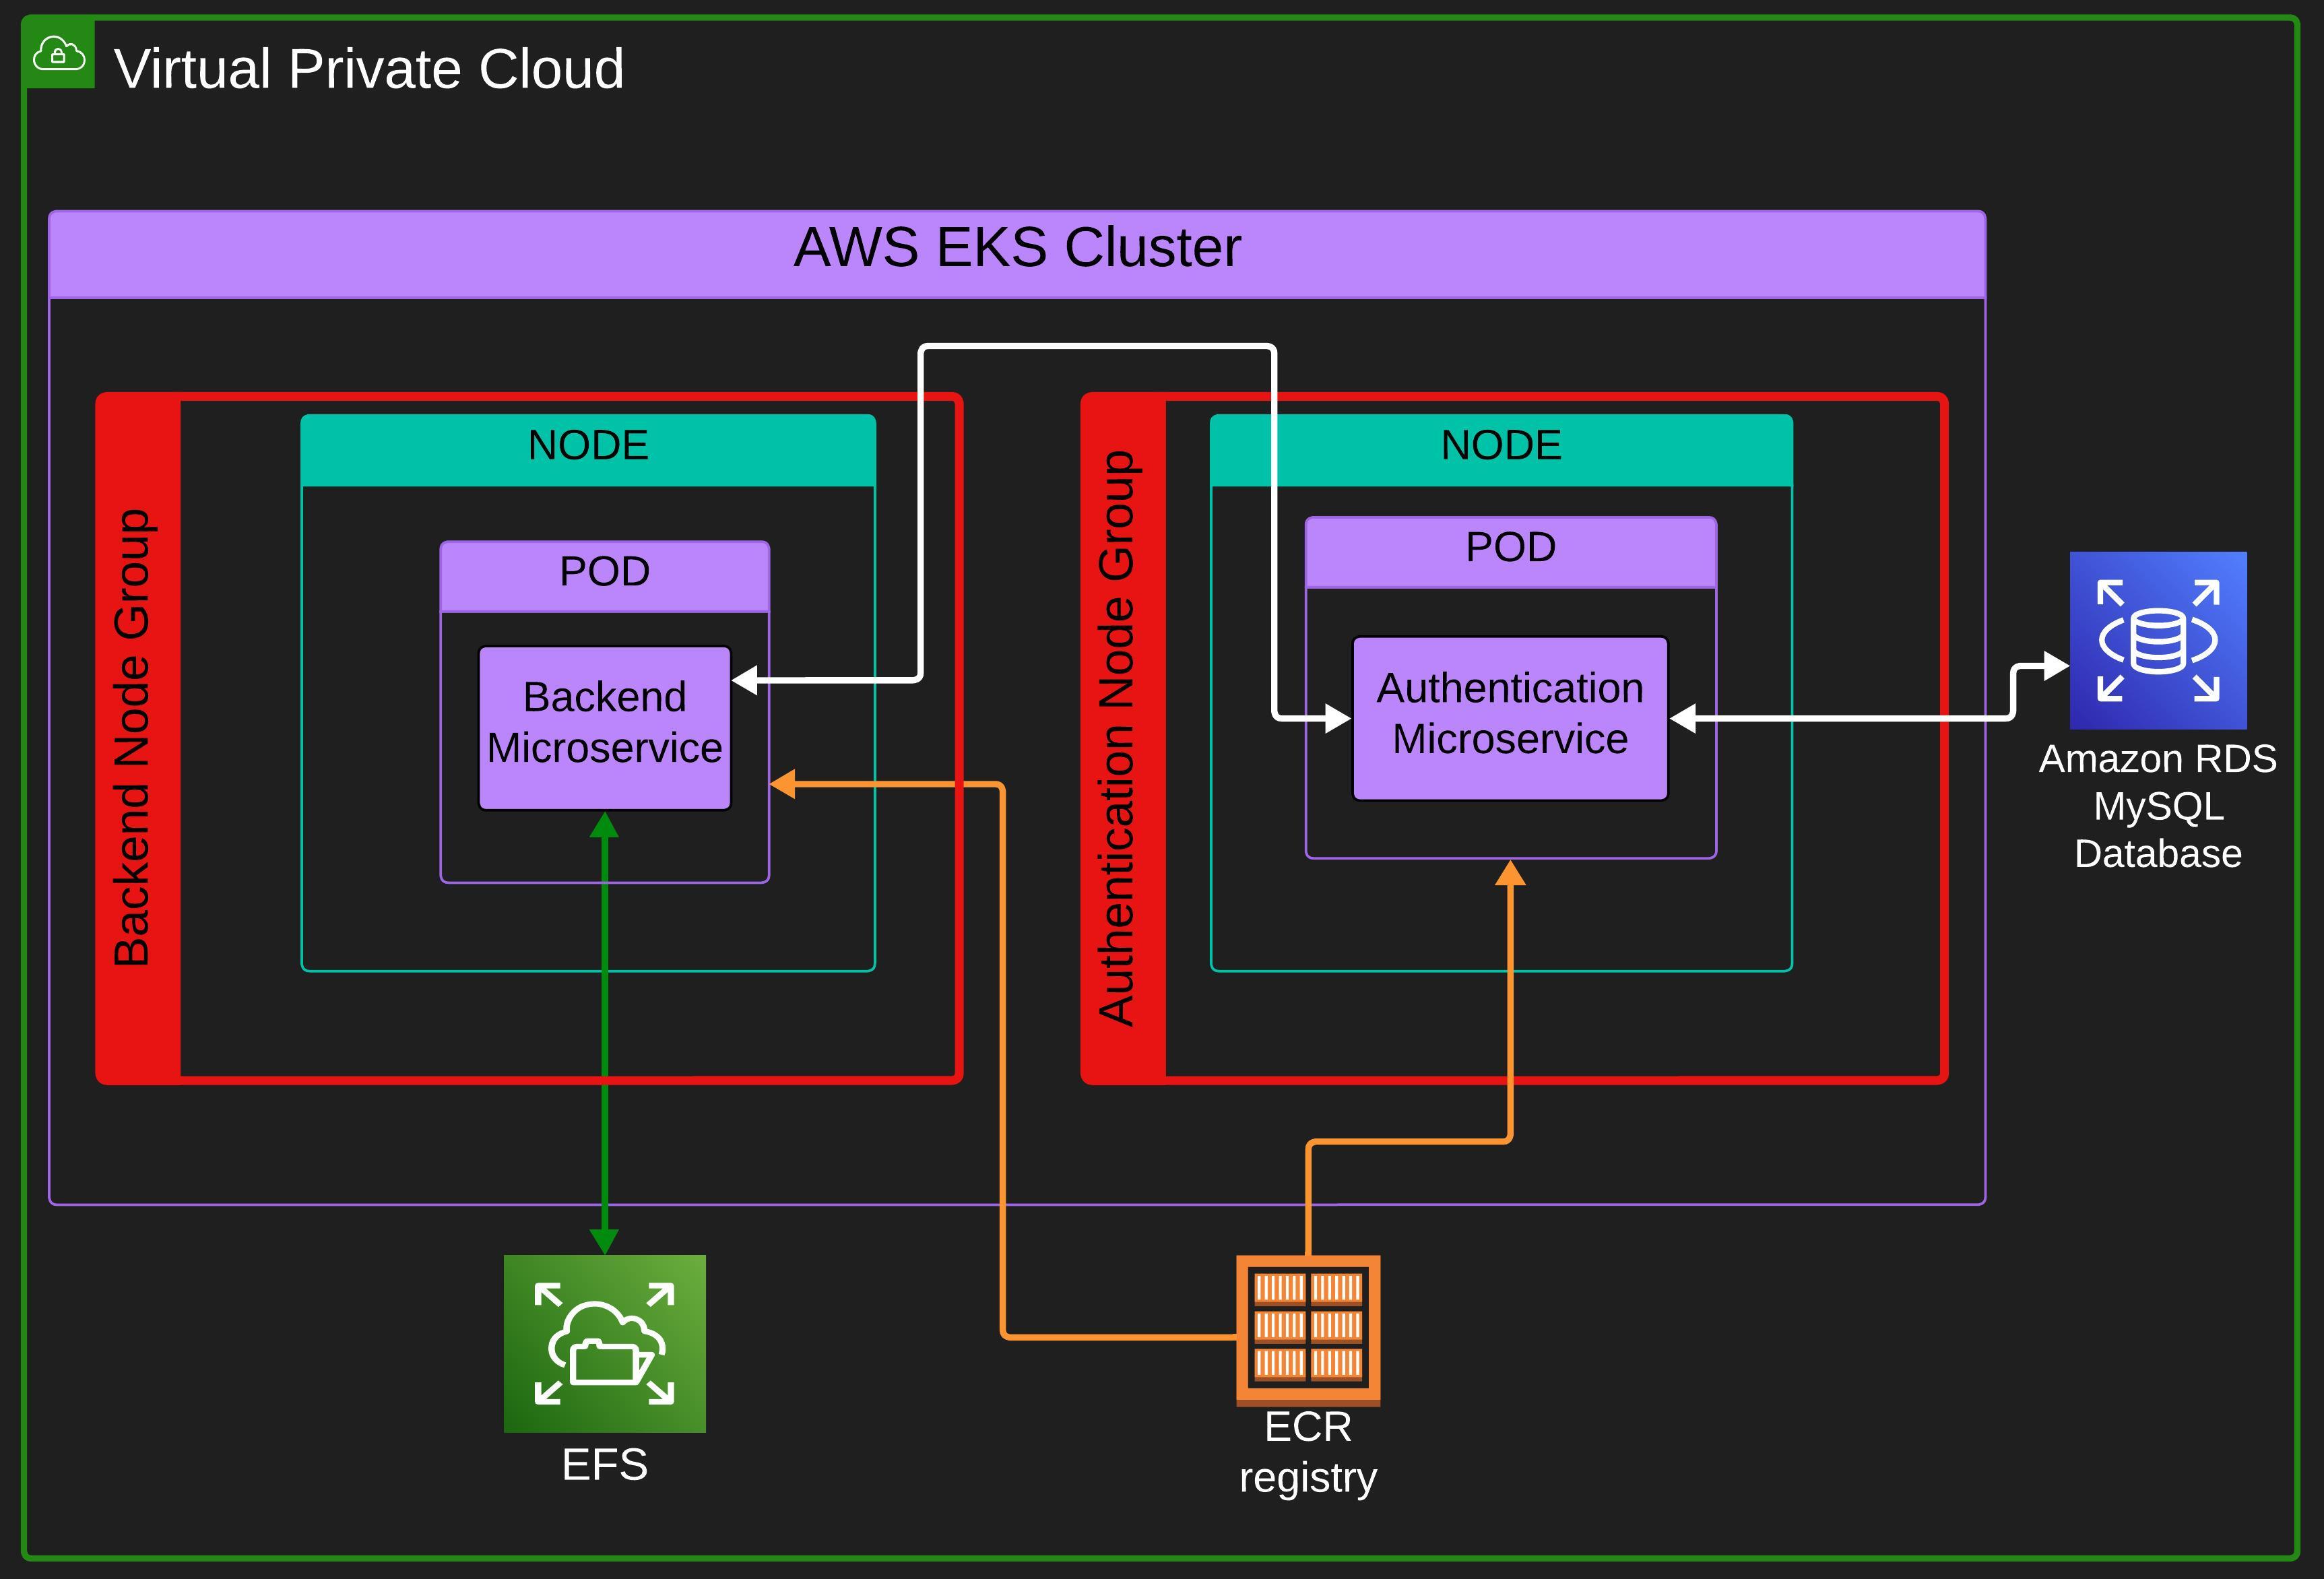
We are deploying the app on AWS EKS Service. In the K8s cluster, we have two node groups.
A node group is a group of nodes, every node in a node group has similar specifications like similar ec2 instances, AMI, Scaling Configs, availability zones, etc. So basically we can define scaling config, availability zones, security groups, and other configs in a node group and all the nodes in that node group will have these configurations. You can read aws documentation for more info on node groups.
We will have one node (when the nodes are not scaled) in each node group and each node will only run a single microservice pod. Since we will be running only a single microservice pod on a node, every time a pod gets scaled the node will also get scaled and provisioned in its respective node group for the new pod.
For the database, we will use AWS RDS service on which we will use a MySQL database instance. We will use the AWS EFS (Elastic File Storage) service as a persistent storage and mount it as a volume on the backend microservice.
Every pod will pull the container images from AWS ECR (Elastic Container Registry). Images will be stored in a private repository.
Terraform
You need to clone the repository below as I will be discussing files that are in this repository in this blog and future blogs also. This repo contains all the project files. You do not need to understand everything in the repository for now. In this blog, we will only deal with the "/Terraform" directory.
I am only discussing these files and you do not need to edit these files however there will be some places where you will have to edit some of the files, I will mention when you need to edit.
Open the terraform directory with VS CODE or any other IDE of your liking. Let's start understanding the terraform files one by one.
provider.tf
Terraform relies on plugins called providers to interact with the cloud provider's API. Let's see what we have in our provider file.
provider "aws" {
    region = "ap-south-1"
    shared_credentials_files = ["~/.aws/credentials"]
}
We have a provider block that mentions "aws" which means we are building the infrastructure on AWS Cloud. If we were building infrastructure on GCP we would have mentioned "google" or "azurerm" for Azure.
Next, I have specified the region where I want to build my infrastructure and then the location of the shared credentials file. A shared credentials file is a file that stores the credentials of the AWS user and it is used by AWS CLI and other parties like Terraform in our case for authenticating to the AWS account.
You need to store your AWS Credentials at this location (or you can provide the location of the file in which aws credentials are stored) and for that, you can run aws configure the command and provide your credentials there. AWS CLI must be needed to be installed for the aws configure command.
We can define other configurations, but this much serves our purpose right. You can explore Terraform AWS Provider documentation here.
ecr.tf
resource "aws_ecr_repository" "backend_ecr" {
  name = "backend"
  image_tag_mutability = "MUTABLE"
}

resource "aws_ecr_repository" "auth_ecr" {
  name = "auth"
  image_tag_mutability = "MUTABLE"
}
We are defining two resource blocks in "ecr.tf" file. Resource block describes one or more infrastructure objects, such as compute instances, databases, security groups or an image repository (ECR) in our case or any other service. Here you can find terraform documentation on resource blocks
I have defined two resource blocks, one for the backend's image repository and the other for the authentication's image repository.
After resource, I have defined "aws_ecr_repository", which is a resource type. A resource type indicates terraform what object to build and in our case, it's building an ECR repository and after defining the resource type I have defined a local name that we can use in HCL (Hasicorp Configuration Language) to refer to the block from somewhere else in the terraform director. The local names for the two blocks are "backend_ecr" and "auth_ecr" respectively.
Within the resource blocks, I have defined the name of the repository and image tag immutability for each repository. Image tag immutability decides whether the tag of the image can be changed or not. The repository will be private because for public repository some other resource type is used. Here is the Terraform ECR documentation.
var.tf
variable "ap-south-1a_subnetID" {
    default = [ "Your ap-south-1a subnet ID" ]
}

variable "cluster_name" {
  default = "Tasklist"
}

variable "eks_role_arn" {
  default = "Your cluster role arn"
}

variable "kubernetes_version" {
  default = "1.28"
}

variable "subnet_ids" {
  default = [ "your ap-south-1a subnet ID", "your ap-south-1b subnet ID", "your ap-south-1c subnet ID" ]
}

variable "node_role_arn" {
  default = "Your node role arn"
}
We have a var.tf file in which we are storing all the variables that are going to be used in various terraform files for example- "efs.tf" and "eks.tf". I have defined subnet IDs, ARN(Amazon Resource Name), names, etc in variables in this file.
To define any variable we use a variable block that starts with "variable" and after it, we define the local name of the variable block. This local name of the variable is the name that we mention when importing the value of this variable. In the variable block, we can define value by the "default" keyword which means that this is the default value of this variable. After default, we can initialize the variable with a string, num or a list.
Note 1: You may not have a cluster role and node role. To make these roles in IAM, follow these AWS documentation-
Note 2:You need to edit this document and put your subnet IDs and ARNs before using it.
efs.tf
resource "aws_efs_file_system" "efs" {
    availability_zone_name = "ap-south-1a"

    encrypted = true

    lifecycle_policy {
        transition_to_ia = "AFTER_30_DAYS"
    }

    tags = {
    Name = "tasklist-efs"
  }
}

resource "aws_efs_mount_target" "efs_mount_target" {
    file_system_id = aws_efs_file_system.efs.id
    subnet_id = var.subnet_ids[0]
}

resource "aws_efs_backup_policy" "aws_efs_backup_policy" {
    file_system_id = aws_efs_file_system.efs.id

    backup_policy {
        status = "DISABLED"
  }
}
In efs.tf we are defining 3 resource blocks. The first one creates an AWS EFS and in this block, I have defined the availability zone that I want my EFS to be in, I could have defined multiple availability zones but for cost-cutting, I have defined only one. I have made the EFS encrypted next and then set the lifecycle policy wherein AWS will transition the data to ia (infrequent access category) after 30 days. At last, I have named the EFS instance as "tasklist-efs" in the tags block.
The second resource block defines a mount target. A mount target is a network endpoint that allows EC2 instances and other services to connect to an EFS file system. This is the endpoint the node that runs the backend microservice will use to connect to the EFS file system.
In this mount target block, I have defined the "file system id" of the EFS file system we created in the first block by referencing the resource type of EFS and then after a dot, referencing the first block's local name which is "efs" and then ending the statement with dot id. Hence the line "aws_efs_file_system.efs.id". At last in this block, I have mentioned the subnet ID of the EFS file system that we created in the first block.
This subnet ID is being imported from the var.tf file by referencing the name (after "var.") of the variable block in which the subnet ID of ap-south-1a is defined in a list. The [0] is the index in the list of subnet IDs where the subnet ID of ap-south-1a is stored. Hence the line var.subnet_ids[0]. It is to be noted here this subnet ID must be of the subnet of the EFS file system that we created in the first resource block.
In the third resource block, I have defined the backup policy of the file system in which I have mentioned the file system ID whose policy I am describing and then set the policy status as "DISABLED" meaning EFS data will not get backed up by the AWS. You can refer to the efs documentation here.
eks.tf
This file includes the IAM role, permission and openID connect for EFS CSI Driver. To understand the making of these in terraform you first need to understand how to make it in AWS Dashboard. Check out the documentation below to make the EFS CSI Driver role in the AWS Dashboard.
resource "aws_eks_cluster" "tasklist_cluster" {
  name = var.cluster_name
  role_arn = var.eks_role_arn
  version = var.kubernetes_version

  vpc_config {
    subnet_ids = var.subnet_ids
  }
}

resource "aws_eks_node_group" "backend-ng" {
  cluster_name = aws_eks_cluster.tasklist_cluster.name
  node_group_name = "backend-nodeGroup"
  node_role_arn = var.node_role_arn
  subnet_ids = var.ap-south-1a_subnetID

  instance_types = ["t3.small"]

  scaling_config {
    desired_size = 1
    max_size = 4
    min_size = 1
  }

  update_config {
    max_unavailable = 1
  }

  labels = {
    "node-group" = "backend-ng"
  }
}

resource "aws_eks_node_group" "auth-ng" {
  cluster_name = aws_eks_cluster.tasklist_cluster.name
  node_group_name = "auth-nodeGroup"
  node_role_arn = var.node_role_arn
  subnet_ids = var.subnet_ids

  instance_types = ["t3.small"]

  scaling_config {
    desired_size = 1
    max_size = 4
    min_size = 1
  }

  update_config {
    max_unavailable = 1
  }

  labels = {
    "node-group" = "auth-ng"
  }
}

// efs csi driver is dependent on node so unless you have provisioned node do not add the add-on.
// also efs csi depends on the IP address, if the node does not have an ip address to give to efs
// csi driver, the add-on will get degraded. Make sure the eni has an additional ip address to give to the add-on
// The nodes I have used here have sufficient IP addresses.

resource "aws_eks_addon" "efs_csi_driver" {
  cluster_name = var.cluster_name
  addon_name = "aws-efs-csi-driver"
  depends_on = [
    aws_eks_node_group.backend-ng
   ]
   service_account_role_arn = aws_iam_role.csi_driver_role.arn
}

data "tls_certificate" "eks" {
  url = aws_eks_cluster.tasklist_cluster.identity[0].oidc[0].issuer
}

resource "aws_iam_openid_connect_provider" "cluster_oidc_provider" {
  depends_on = [ aws_eks_cluster.tasklist_cluster ]
  client_id_list     = ["sts.amazonaws.com"]
  thumbprint_list = [data.tls_certificate.eks.certificates[0].sha1_fingerprint]
  url = aws_eks_cluster.tasklist_cluster.identity[0].oidc[0].issuer
}

resource "aws_iam_role" "csi_driver_role" {
  name = "AmazonEKS_EFS_CSI_DriverRole"
  assume_role_policy = data.aws_iam_policy_document.assume_role.json
}

resource "aws_iam_role_policy_attachment" "policy_attachment" {
  policy_arn = "arn:aws:iam::aws:policy/service-role/AmazonEFSCSIDriverPolicy"
  role = aws_iam_role.csi_driver_role.name
}

data "aws_iam_policy_document" "assume_role" {
  statement {
    effect = "Allow"

    principals {
      type        = "Federated"
      identifiers = ["${aws_iam_openid_connect_provider.cluster_oidc_provider.arn}"]
    }

    condition {
      test = "StringLike"
      variable = "${aws_iam_openid_connect_provider.cluster_oidc_provider.url}:aud"
      values = ["sts.amazonaws.com"]
    }

    condition {
      test = "StringLike"
      variable = "${aws_iam_openid_connect_provider.cluster_oidc_provider.url}:sub"
      values = ["system:serviceaccount:kube-system:efs-csi-*"]
    }

    actions = [
      "sts:AssumeRoleWithWebIdentity",
    ]
  }
}
I have defined these in eks.tf-
AWS EKS Cluster
In the "aws_eks_cluster" resource block we are building a cluster and setting this block's local name as "tasklist_cluster". Inside this block, we are defining the name of the cluster, ARN (Amazon Resource Name)of the cluster role, the Kubernetes version of the cluster and the subnets where the cluster will run. Here is the Terraform doc on AWS EKS Cluster.
EKS Cluster Nodes
We are defining two node groups in two "aws_eks_node_group" resource blocks. One node group is for the backend and the other is for authentication.
Notice we are specifying only one subnet ID (ap-south-1a) in the backend node group while the authentication node group has all the 3 availability zones. This is because if we provide all 3 availability zones in the backend node group and the node gets provisioned in an availability zone other than ap-south-1a, the EFS file system will not be able to connect to the backend pod since we have a mount target only in ap-south-1a availability zone and not in other availability zones. We could have made mount targets in other availability zones also but for that, we need to have multi-availability zone deployment of EFS and we did not do that for cost-cutting in AWS bill.
So we have to match the availability zone of the backend node group and the EFS file system so that EFS can connect to the backend pod.
In the node group, I have defined the node group name, node role ARN, instance type, scaling config and label.
Here is the Terraform doc in AWS EKS Nodes.
AWS EFS CSI (Container Storage Interface) Driver Add-On for persistent storage
CSI Driver can be installed in the cluster with AWS EKS CSI Driver Add-On that is provided by AWS EKS. I am adding it in the "aws_eks_addon" resource block. I have defined the cluster name in which the add-on is to be installed, the add-on name that specifies which add-on is to be installed and the role ARN that the add-on will use. Depends on line specifies that before installing the add-on, the backend node group should be provisioned.
Check out this terraform doc on the AWS EKS add-on.
Data block to get cluster OIDC URL
Data blocks are used to define and fetch data from external sources or providers while executing your infrastructure code. Data blocks allow you to retrieve information from existing resources, such as AWS or Azure, and use that information in your Terraform configuration. Read more on data here.
I have used the "tls_certificate" data source to get SHA1 fingerprint information of the cluster's tls certificate. We will use this fingerprint information in the "aws_iam_openid_connect_provider" resource block. More info on this data source is here.
Identity Provider of the cluster for EFS CSI Driver Role.
I have created an Identity provider in the "aws_iam_openid_connect_provider" resource block. The IAM policy of the EFS CSI Driver role will use this identity provider. In this block, I have a "depends_on" line which just makes sure that this OIDC gets created after the cluster. Then the client is "sts.amazon.com". Then I got the thumbprint from tls certificate data source and at last I mentioned the URL of the cluster's OIDC.
Here is the doc on the usage of the OpenID connect provider.
EFS CSI Driver Role.
I have defined the EFS CSI Driver role in the "aws_iam_role" resource block wherein I am defining the name of the role of the CSI Driver add-on and its assume role policy, this policy has been defined in "aws_iam_policy_document" data source at last of the file. Note that I have described assume role policy here and not the permissions policy.
Check out IAM role docs in Terraform here.
Policy Attachment of EFS CSI Driver Role.
We can define the EFS CSI Driver role's permission policy with an "aws_iam_role_policy_attachment" resource block. In this block, I have mentioned the ARN of the policy that I want to be attached to the EFS CSI Driver role and the name of the role that I want it to be attached to.
More info on the policy attachment is here.
Role Policy document data block of EFS CSI Driver Role.
I have defined the IAM policy document in "aws_iam_policy_document" and this policy is being used by the EFS CSI Driver role. I have made this policy by making this policy in aws dashboard and then analyzing it and then making the same copy by writing that policy in this terraform. Check out the Terraform IAM Policy document doc for more info here.
efs csi driver is dependent on node so unless you have provisioned node do not add the add-on.
also, efs csi depends on the IP address, if the node does not have an ip address to give to efs csi driver, the add-on will get degraded. Make sure the eni has an additional ip address to give to the add-on.
The nodes I have used here have sufficient IP addresses.
rds.tf
resource "aws_db_instance" "mysql-postgres-db" {
    engine = "mysql"
    db_name = "tasklist_db"
    instance_class = "db.t3.micro"
    identifier = "tasklist-db-instance"
    availability_zone = "ap-south-1c"
    multi_az = false
    storage_type = "gp2"
    allocated_storage = "20"
    port = 3306
    publicly_accessible = true
    username = "senpai"
    password = "onlysenpaiknows"
    skip_final_snapshot = true
}
In the rds.tf file I have defined MySQL database in the AWS RDS Service. The database is defined in the "aws_db_instance" resource block. In the block, I have defined the database specifications.
Specifications are the engine that defines what database to use I have used MySQL database. Next, I defined the database name and named it "tasklist_db" and then the instance class is defined. The instance class determines the ec2 AWS RDS will be used to run the database. I have used the "db.t3.micro" instance which is free tier eligible.
Next identifier is defined, identifier is the unique name that we define for an RDS instance. After this, I have defined the availability zone where the database instance will run. Next, I have set the availability zone to false which means the database will run only in the availability zone I have defined. Then I defined the storage type as "gp2" and after this set the storage capacity that our database will have to 20 GB.
I have set the database port to 3306 and then made the database publicly accessible. I have defined the username and password for the database and at last, I have set skip the final snapshot to true which determines whether a final DB snapshot is created before the DB instance is deleted. If true is specified, no database snapshot is created.
Refer to Terraform RDS documentation for more info here.
Cluster and Node Role
Before building the architecture your node role should have these policies-
AmazonEC2ContainerRegistryReadOnly
AmazonEKS_CNI_Policy
AmazonEKSWorkerNodePolicy
Your cluster role should have these policies-
- AmazonEKSClusterPolicy
You can search for these policies by copying the name from here and searching in AWS IAM Policies.
Build the Cloud Architecture
To build architecture you must have terraform installed in your machine. Follow the Terraform documentation below to install Terraform in your system-
You just need to edit the var.tf file and add a valid aws credential file location in the provider.tf file, rest of the file you do not need to edit.
If you do this correctly, your infrastructure will get built by these 3 commands (Your terminal should be in the "Terraform" directory in the project)-
terraform initterraform planterraform apply --auto-approve
To delete all the infrastructure you can simply run the below command in the "Terraform" directory-
terraform destroy --auto-approve
I hope you have built the architecture successfully and if not, feel free to share your errors in the comment section. Please give feedback and share your thoughts on the project.
Share the blog on socials and tag me onXandLinkedInfor the #buildinpublic initiative.
******Thank you for following along😁😇******


