Deploying Microservice App on K8s
Part 4: Persistent Storage, ConfigMaps and Secrets Manifests

I document my learnings here.
This blog is Part 3 of the blog series it is recommended that you read the previous blogs before this one. Here is the Part 1 of the series.
In this blog, I will discuss the directories in microservice applications and you can find the directories discussed in this blog in the /Manifests App directory in the project repository. Clone the repository below-
Persistent Storage
To deploy the application we need to understand how to implement persistent storage in the AWS EKS Cluster. As I have said in the previous blogs, we will use AWS EFS (Elastic File System) as a persistent storage and mount volume from this storage on the backend microservice's container.
I highly recommend reading the article below on persistent storage in the AWS EKS Cluster before moving further in this blog.
You do not need to edit the discussed files, I will tell you when to edit and what to edit as I discuss these files.
So let's discuss the manifest files for persistent storage
storage_class.yaml
kind: StorageClass
apiVersion: storage.k8s.io/v1
metadata:
  name: cluster-persistent-storage
provisioner: efs.csi.aws.com
reclaimPolicy: Retain
parameters:
  provisioningMode: efs-ap
  fileSystemId: "Your EFS file sytem Id"
  directoryPerms: "700"
Here is the first Kubernetes manifest, it defines a name for this storage class and next it defines a provisioner which is the AWS EFS CSI DRIVER in our case.
Reclaim Policy is set to Retain which means PV (persistent volume) is not automatically deleted when the PVC is deleted or when the application is terminated. Instead, the PV and its data are retained, and it's up to the cluster administrator to manually reclaim or delete the resources.
Next, there is a parameter section that defines the provisioning mode. The provisioningMode parameter is used to define the mode in which the storage should be provisioned. In our case, the value is set to efs-ap, indicating Elastic File System (EFS) automatic provisioning mode with access points.
Next in the parameter section, you have to paste the file system ID of your EFS file system. You can get it in the EFS Service.
At last, directory read and write permission is defined, allowing only the owner (user) to read, write, and execute files within that directory.
Here is the K8s documentation on storage classes-
pvc.yaml
apiVersion: v1
kind: PersistentVolumeClaim
metadata:
  name: backend-pvc-claim
  namespace: backend
spec:
  accessModes:
    - ReadWriteMany
  storageClassName: cluster-persistent-storage
  resources:
    requests:
      storage: 1Gi
This is the file where PVC (Persistent Volume Claim) is defined. The claim is named as backend-pvc-claim and this claim resides in the "backend" namespace.
In the spec section accessModes is defined which is set to ReadWriteMany which means multiple pods can read and write to this PVC at a time.
Next storageClassName is defined as cluster-persistent-storage which is the name of our storage class that I described above.
Next in the resources, this PVC will request 1 GB of data capacity from the storage class.
This is it, storage_class.yaml and pvc.yaml are the only two files required to provision persistent volume in the EKS cluster. Now we just need to mount the PVC to the backend microservice's pod.
ConfigMaps and Secret Manifests
These are important manifest files as you have we have to define the passwords and endpoints in these files and the communication between microservices and database will happen only if we do this part right.
In the previous blog, I discussed the ConfigMaps and secrets and mentioned that we do not have to change the configuration in the source code of microservices and you can make those configs as it is because ConfigMaps and Secret will inject configuration files in the container for us.
ConfigMap and secret for Authentication Microservice
auth-configs.yaml
apiVersion: v1
kind: ConfigMap
metadata:
  name: auth-config
data:
  config.env: |
    DB_HOST= "Your RDS Database Endpoint"
    APP_HOST=0.0.0.0
This is the ConfigMap manifest and this ConfigMap is named "auth-config" that is defined in "metadata" section.
Next in the data section, I have a script that creates a file as config.env which as you should know is the name of the config file in the source code. This file has a DB_HOST variable and a APP_HOST variable. You just need to paste the database endpoint of your RDS MySQL database here.
Make the cloud architecture with the terraform command and go to the AWS RDS service and in there you will see the database, in the database you will the endpoint in the Connectivity and Security section.
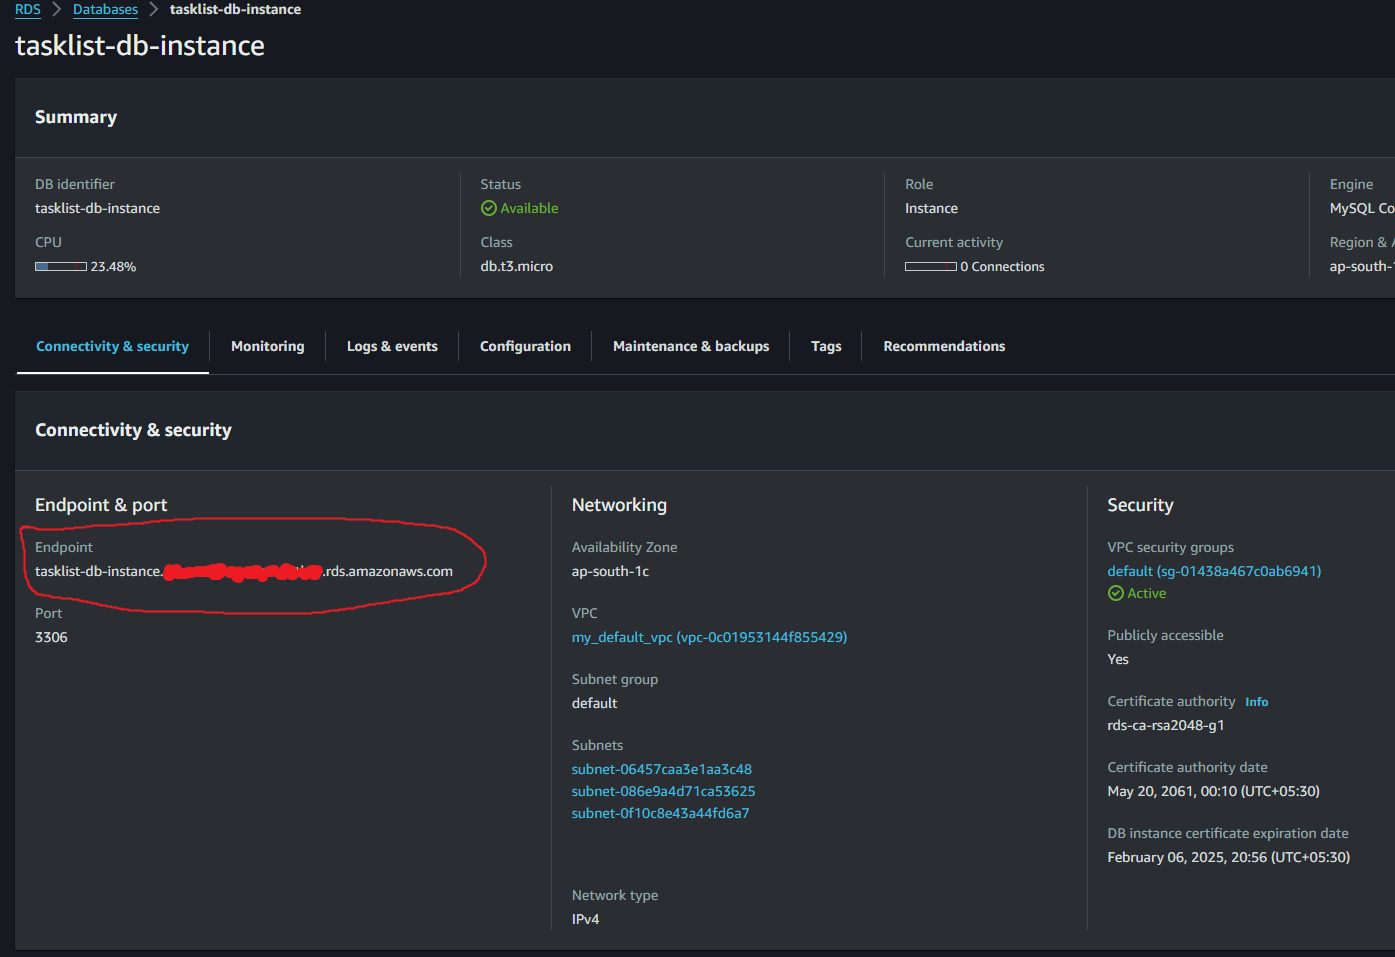
Whenever you build the architecture from the same rds.tf file after destroying the architecture, the RDS database will have this same endpoint so you do not have to update this endpoint in ConfigMap every time you build the architecture after destroying it.
You can find K8s ConfigMap doc here.
auth-secrets.yaml
apiVersion: v1
kind: Secret
metadata:
  name: auth-secret
type: Opaque
data:
  secret.env: |
    REFUQUJBU0U9dGFza2xpc3RfZGIKREJfVVNFUk5BTUU9c2VucGFpCkRCX1BBU1NXT1JEPW9ubHlz
    ZW5wYWlrbm93cwpKV1RfU0VDUkVUX0tFWT1kNzRmYWUxMDQzYzdlN2ExMWM3NDE2YWRjMjlmMmE4
    MDYyMzdiOWU1N2I4MTViYzgwMGM1ODA3ZWNjMjc3OTI2ClNFQ1JFVF9LRVk9MjhhYWM1N2U2YTg3
    MTZlY2JmNGRiNjNlN2E5NDJjMGE3OTM5MjE3NTI1ODAyMjFkMjA0MjY4YjhjNzQ2MzZhOQ==
This is the K8s secret file that contains the secret file in base64 encoded value. This secret works similarly to ConfigMap as I have a similar script here which makes a file named "secret.env" and in that file, it pastes the secret database config in base64 encoded format.
The secret file in the repository source code will work just fine if you haven't changed any value in the rds.tf file and you do not have to edit this file. However, it is important to know how to get the base64 encoded value for secret configs.
Here is how you can make yourself this base64 encoded config.
In a file write down the secret configurations and the value of variables like DATABASE, DB_USERNAME and DB_PASSWORD you can see the value of these variables in Terraform rds.tf file.
The DATABASE variable stores the name of the database that we want to connect to, we have defined it in a terraform file along with the database password and database username so you can copy these values from there. You can change the JWT_SECRET_KEY and SECRET_KEY values or keep them the same it's up to you.
You can also copy the whole config below at once with ctrl+a.
DATABASE=tasklist_db
DB_USERNAME=senpai
DB_PASSWORD=onlysenpaiknows
JWT_SECRET_KEY=d74fae1043c7e7a11c7416adc29f2a806237b9e57b815bc800c5807ecc277926
SECRET_KEY=28aac57e6a8716ecbf4db63e7a942c0a793921752580221d204268b8c74636a9
After you have copied the whole config you need to encode this config. You can do this by entering this command in the terminal-
echo "Your copied config" | base64
In the above command, you have to keep the double quotes and in the quotes past the configs.
Below is the actual command I used to encode the above config-
echo "DATABASE=tasklist_db
DB_USERNAME=senpai
DB_PASSWORD=onlysenpaiknows
JWT_SECRET_KEY=d74fae1043c7e7a11c7416adc29f2a806237b9e57b815bc800c5807ecc277926
SECRET_KEY=28aac57e6a8716ecbf4db63e7a942c0a793921752580221d204268b8c74636a9" | base64
Once you execute this command you will see a base64 encoded value of this file, you need to copy this base64 encoded value and paste it into the K8s secret manifest file for the backend microservice (auth-secrets.yaml).
You can find K8s secret doc here.
ConfigMap and secret for Backend Microservice
backend-configs.yaml
apiVersion: v1
kind: ConfigMap
metadata:
  name: backend-config
  namespace: backend
data:
  config.env: |
    auth=http://auth-service.auth:8000
    APP_HOST=0.0.0.0
This ConfigMap manifest is similar to that of authentication, the manifest is named "backend-config" and in the backend namespace. In the script it creates a file named "config.env" and has the authentication microservice's endpoint in the auth variable.
The authentication's endpoint is the name of the service that the authentication deployment will use which is auth-service and after the service .auth is there which means that the service resides in the auth namespace and at the end, the port :8000 is there in which the auth is listening to.
The APP_HOST is listening to all network interfaces and it need not be changed.
backend-secrets.yaml
apiVersion: v1
kind: Secret
metadata:
  name: backend-secret
  namespace: backend
type: Opaque
data:
  secret.env: |
    U0VDUkVUX0tFWT0vZHM6NjgzNHR2I2RhCg==
Backend's secret manifest is also similar to that of the authentication. The name of this secret is backend-secret and it is in backend namespace. In the script, it creates a file named secret.env and stores the base64 encoded value of the session key for the backend.
You do not need to change anything in this file and here is how I created it-
SECRET_KEY=/ds:6834tv$b#da
I encoded this config by this command-
echo "SECRET_KEY=/ds:6834tv$b#da" | base64
After this command, the terminal will output the base 64 encoded value, I just pasted that value in this secret manifest file.
Share the blog on socials and tag me on X and LinkedIn for the #buildinpublic initiative.
******Thank you for reading😁😇******


