Deploying Microservice App on K8s
Part 8: Final Deployment

I document my learnings here.
This blog is Part 8 of the blog series it is recommended that you read the previous blogs before this one. Here is the Part 1 of the series.
Clone the project repository-
In this blog, we will finally deploy the microservices application so let's deploy
To deploy the application, you first need to build the cloud architecture, so build the cloud architecture and follow all the steps of all the previous blogs.
Check These Before Deployment
Once you have built the cloud architecture check these manifest files in the private repository of your manifest files.
Check the
storage_class.yamlmanifest and updatefileSystemIdwith the ID of your EFS file system, you built with this cloud architecture.Check
auth-configs.yamlmanifest and ensureDB_HOSThas the endpoint of your AWS RDS MySQL database. The endpoint of your database will remain same even if you destroy the architecture and rebuild it still you need to ensure this. I have discussed how to see the database endpoint in PART 4 of this blog series.Check if you have deployed both the auth and backend Image to your AWS ECR Repository. I have discussed how to upload the Image to your AWS ECR repository in Part 5 of this blog series.
Check if you have the correct URI of the Image in
backend_deploy.yamlandauth_deploy.yamlmanifest files.Check argo-secret.yaml file and ensure that have made a private repository for manifest and paste the link and Personal Access Token of the repository in the file. You can refer to part 6 of this blog series.
Check argocd.yaml file and ensure you have pasted the link to your private manifest repository in the file. You can refer to part 6 of this blog series.
Make Table in Database
To make the table in the database, you need to install PopSQL which is a tool using which you can connect and run commands in a remote database. You can install PopSQL from here.
After installing PopSQL, open it and create a new connection. You can go to the new connection option by clicking in your profile picture in the bottom left.
You will see Manage connection option there, click on it.
You will be on the connections page now, click on New connection.
Now in name, the connection as you like, paste the endpoint of your AWS RDS MySQL database in Hostname field and paste 3306 in the Port field.
In the Database field paste tasklist_db.
Paste senpai in Username field and onlysenpaiknows in Password field.
Click on Test to test if you are able to connect to the database. If test failed check the endpoint, username, port, Database or password that you have provided.
If the test passes click on Connect option.
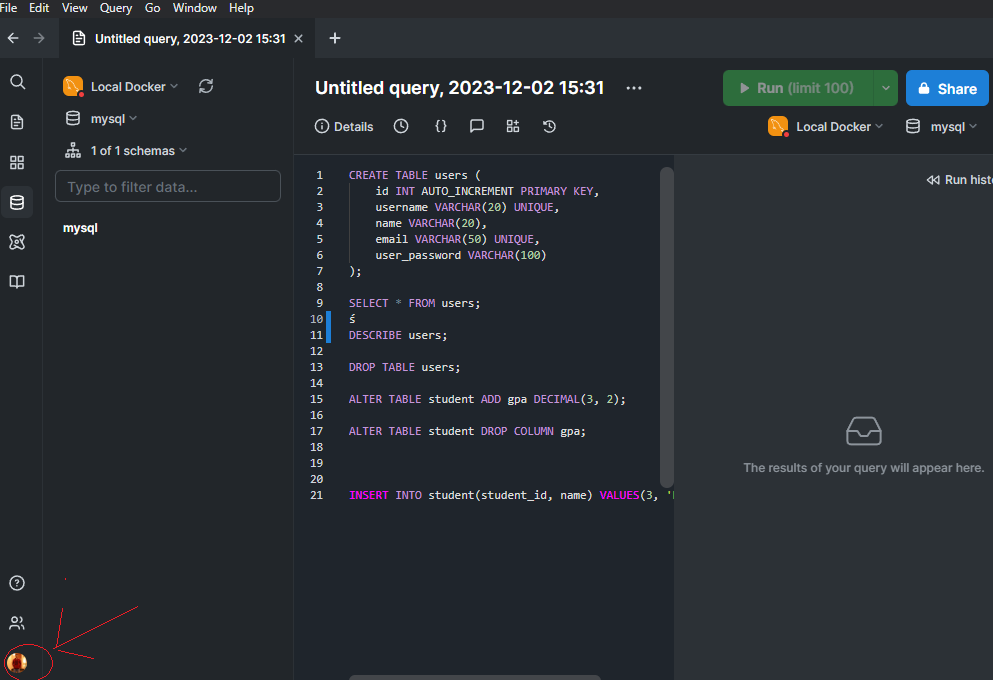
Create a query and paste the below code one the query
CREATE TABLE users (
    id INT AUTO_INCREMENT PRIMARY KEY,
    username VARCHAR(20) UNIQUE,
    name VARCHAR(20),
    email VARCHAR(50) UNIQUE,
    user_password VARCHAR(100)
);
Run this query in your AWS RDS MySQL database. Make sure you have connection set to your AWS RDS Connection. After successfully running this query you will have created a table in your database which will store username, password, email and name of the users.
Deploy
Open the private repository of manifests in your local machine. Open the terminal in the same repository.
I have mentioned these commands as a script in one-click-deploy.sh file so that you don't have to run these commands one by one. So instead of entering these commands one by one you can run this script with the command-
bash one-click-deploy.sh
You need to update your Kubeconfig file so that it targets the command you are going to type to your cluster. To update just enter the command below in terminal-
aws eks update-kubeconfig --region ap-south-1 --name TasklistApply the
storage_class.yamlfile, type the command below in terminal-kubectl apply -f storage_class.yamlCreate namespace for backend, type the command below in terminal-
kubectl create namespace backendCreate namespace for auth, type the command below in terminal-
kubectl create namespace authCreate namespace for argocd, type the command below in terminal-
kubectl create namespace argocdApply
pvc.yamlfile, type the command below in terminal-kubectl apply -f pvc.yamlApply
auth-configs.yamlfile, type the command below in terminal-kubectl apply -f auth-configs.yamlApply
auth-secrets.yamlfile, type the command below in terminal-kubectl apply -f auth-secrets.yamlApply
backend-configs.yamlfile, type the command below in terminal-kubectl apply -f backend-configs.yamlApply
backend-secrets.yamlfile, type the command below in terminal-kubectl apply -f backend-secrets.yamlApply
cluster-autoscaler.yamlfile, type the command below in terminal-kubectl apply -f cluster-autoscaler.yamlApply
auth_deploy.yamlfile, type the command below in terminal-kubectl apply -f auth_deploy.yamlApply
backend_deploy.yamlfile, type the command below in terminal-kubectl apply -f backend_deploy.yamlInstall ArgoCD in the cluster, type the command below in terminal-
kubectl apply -n argocd -f https://raw.githubusercontent.com/argoproj/argo-cd/stable/manifests/install.yamlApply
argo-secret.yamlfile, type the command below in terminal-kubectl apply -f argo-secret.yamlSet the ArgoCD server to LoadBalancer type so that we can access it from the browser, type the command below in terminal-
kubectl patch svc argocd-server -n argocd -p '{"spec": {"type": "LoadBalancer"}}'Apply
argocd.yamlfile, type the command below in terminal-kubectl apply -f argocd.yaml
Check the website
After running the above commands successfully, the microservices will be deployed. You can now go the website. To go to the website get the endpoint of the LoadBalancer of Backend Microservice by entering the command below-
kubectl get svc -n backend
Copy the EXTERNAL-IP of the LoadBalancer

Go to the website and paste this EXTERNAL-IP and prefix it with :5000 for port.
For example-
aa730261d4a534f1482782015def4e8b-1027384791.ap-south-1.elb.amazonaws.com:5000
After searching this in your browser you will see the website🎉🎉🎉🎉🎉
You can now explore the website.
The project does not end here, in the next blog We will implement CI/CD, so I will meet you in the next blog.
If you are facing any problems, errors and difficulties don't shy away from asking in the comment section so that I can help you with the project.
Share the blog on socials and tag me on X and LinkedIn for the #buildinpublic initiative.
******Thank you for following along😁😇******


